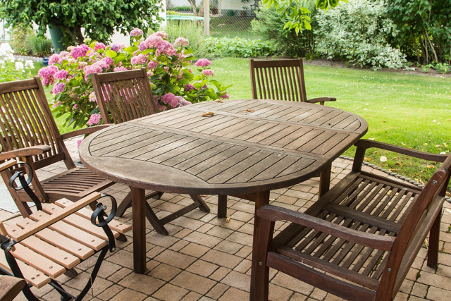
In a world of disposable goods, there's something uniquely satisfying about restoring wooden kitchen worktops and furniture their former glory. Whether it's a cherished heirloom passed down through generations or a beloved kitchen centerpiece showing signs of wear and tear, the art of restoration allows us to breathe new life into these pieces.
In this comprehensive guide, we'll explore the step-by-step process of restoring wooden furniture and kitchen worktops, from assessing their condition to applying the finishing touches. So, roll up your sleeves and prepare to unleash your inner craftsman as we embark on a journey of rejuvenation and transformation.
1. Assess the Condition of Your Wooden Worktops and Furniture
Before jumping into any restoration projects, the crucial first step is to assess the condition of your wooden worktops and furniture thoroughly.
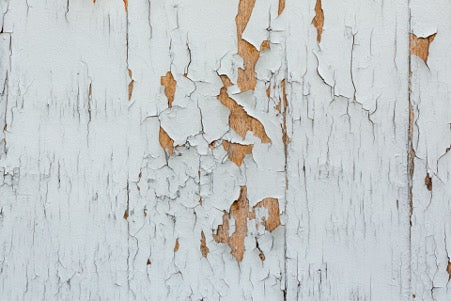
For furniture, pay close attention to any visible signs of wear and tear on the wood finish, such as scratches, dents or water damage. Look for loose joints or missing hardware that may need repair. Additionally, examine the existing finish for signs of flaking or discolouration, as this may indicate the need for stripping and refinishing.
When assessing kitchen worktops, inspect for scratches, stains or areas of damage caused by heat or moisture. Check the edges for any signs of wear or chipping, as well as the overall stability and levelness of the surface. By taking note of these specific signs and concerns during the assessment phase, you'll be better equipped to plan and execute the restoration process effectively, ensuring a successful outcome for your wooden furniture and worktops.
If your wooden furniture has been painted, our guide on stripping paint from wood may be of assistance.
2. Clean and Prepare the Surface
Once you've assessed the condition of your wooden worktops and furniture , the next step in the restoration process is to thoroughly clean and prepare the surface.
For furniture, start by removing any dust, dirt, or grime buildup using a gentle cleaning solution and a soft cloth. Stubborn stains may require a bit of extra elbow grease, but be cautious not to damage the wood in the process. Depending on the extent of buildup, you may also need to use a mild detergent or specialized wood cleaner to lift away deeper stains.
For kitchen worktops, begin by clearing away any clutter or items on the surface, then wipe down the entire area with a mixture of warm water and mild soap. Pay close attention to areas prone to spills or food residue, such as around the sink or stove. For tougher stains or grease buildup, consider using a degreaser or specialised cleaner formulated for use on wooden surfaces.
Once cleaned, allow the furniture or worktops to dry completely before proceeding to the next steps of the restoration process. This thorough cleaning and preparation stage lays the foundation for a successful restoration, ensuring that the surface is ready to receive any repairs or refinishing treatments effectively.
3. Repair Damaged Areas
After thoroughly cleaning and preparing the surface, it's important to next address any damaged areas on your wooden worktops and furniture kitchen worktops.
For furniture, begin by looking for scratches, dents or cracks in the wood. Minor scratches can often be buffed out using fine-grit sandpaper or steel wool, while deeper scratches may require wood filler to fill in the damaged area. Similarly, dents and cracks can be filled with wood filler or epoxy resin, then sanded smooth once dry. Loose joints or missing hardware should also be repaired at this stage to ensure the structural integrity of the furniture.
When it comes to kitchen worktops, focus on repairing any chips, scratches or dents in the surface. Use wood filler or epoxy resin to fill in the damaged areas, then sand the surface smooth to blend with the surrounding wood. Pay attention to any areas of water damage or rot, as these may require more extensive repairs or replacement of the affected sections.
4. Sand and Smooth the Surface
After thoroughly cleaning and repairing any damaged areas, it's time to sand and smooth the surface of both your wooden furniture and kitchen worktops.
Using a medium-grit sandpaper, begin by gently sanding the entire surface in the direction of the wood grain. This helps to remove any remaining imperfections, smooth out rough patches and create a uniform surface for the next steps of the restoration process. Pay close attention to areas where repairs were made, ensuring they blend seamlessly with the surrounding wood. For furniture with intricate details or hard-to-reach areas, consider using a sanding sponge or fine-grit sandpaper to achieve a smooth finish.
Similarly, for kitchen worktops, focus on sanding down any filled-in areas or uneven patches to create a level surface. Once you've completed the sanding process, wipe away any dust or debris with a clean, damp cloth and allow the surface to dry completely before proceeding further.
5. Stain or Refinish the Wood
In the restoration process, staining or refinishing the wood is a transformative step that enhances the appearance and protects the surface of both furniture and kitchen worktops.
Choosing the Right Stain or Finish
-
Consider the type of wood and desired aesthetic when choosing a stain or finish for furniture and kitchen worktops.
-
Select a wood stain that enhances the natural beauty of the wood for furniture, offering protection against wear and tear.
-
Opt for a finish designed for wooden pieces, such as our Auro 143 Linseed Oil Varnish - this is also a great finish for kitchen worktops, as it is highly durable and water repellant.
-
Choose from a variety of wood stain colours to achieve the desired colour for your furniture, ranging from rich and dark to light and natural.
-
Prioritise a protective barrier against moisture, heat and stains when selecting a finish for kitchen worktops, our Osmo 1101 Wood Wax is a great choice.
-
Decide on the level of sheen desired, whether matte, satin or glossy, to achieve the desired appearance for both furniture and kitchen worktops.
See Also: Best eco wood treatment guide | Choosing the best wood stain.
Applying the Stain or Finish
Proper application of your stain or finish is crucial for achieving the desired results and ensuring the longevity of both furniture and kitchen worktops. Begin by preparing the surface according to the manufacturer's instructions, ensuring it is clean, dry and free from any dust or debris.
For furniture, apply the woodstain evenly with a brush or cloth, working in the direction of the wood grain to ensure uniform coverage. Allow the stain to penetrate the wood for the recommended time before wiping away any excess with a clean cloth. Once the stain has dried completely, apply multiple coats of finish, such as polyurethane or lacquer, using a brush or sprayer, sanding lightly between coats for a smooth finish.
Similarly, for kitchen worktops, apply the finish evenly with a brush or roller, ensuring complete coverage and allowing each coat to dry thoroughly before applying additional coats. Pay close attention to edges and corners to ensure they are properly sealed against moisture and spills.
6. Apply a Protective Finish
Importance of a Protective Finish
In the restoration process, applying a protective finish is paramount to preserving the beauty and integrity of both furniture and kitchen worktops. This step acts as a barrier against everyday wear and tear, moisture damage and stains, ensuring the longevity of your restored pieces.
For furniture, a protective finish such as polyurethane or lacquer provides a durable shield that enhances the wood's natural beauty while safeguarding it from scratches, spills and fading due to UV exposure.
Similarly, for kitchen worktops, a protective finish seals the surface, guarding against water damage, heat marks and stains from food and liquids.
Varnish, Oil or Wax?
Selecting the appropriate finish is crucial for both furniture and kitchen worktops to protect the wood and enhance its appearance. Varnish, oil and wax are popular choices, each offering unique benefits depending on the wood type and desired outcome.
- Varnish provides a durable and protective coating, making it ideal for high-traffic areas and furniture subjected to heavy use. It's particularly suitable for hardwoods like oak and mahogany that require strong protection against scratches and moisture.
- Oil finishes, such as tung oil or linseed oil, penetrate the wood to nourish and enrich its natural colour and grain. This option is well-suited for softer woods like pine and cedar, offering a warm and natural finish that highlights the wood's character.
- Wax provides a soft and lustrous sheen while offering moderate protection against moisture and stains. It's a versatile choice for both furniture and kitchen worktops, providing a smooth and tactile finish that enhances the wood's natural beauty.
When selecting the best finish for your wood type, consider factors such as durability, maintenance requirements, and the desired aesthetic outcome to ensure a successful restoration.
7. Final Touches and Maintenance Tips
Buffing and Polishing
Buffing and polishing are essential to achieving a flawless, uniform surface for both furniture and wooden worktops.
Using a clean, soft cloth or buffing pad, gently buff the surface in circular motions to remove any excess finish and smooth out any imperfections. This process not only enhances the sheen of the finish but also helps to blend any uneven areas for a seamless appearance.
It is important to be gentle while buffing to prevent any damage to the finish; regularly clean and replace buffing pads for best results. After thoroughly buffing your wooden pieces, select a polish or hard wax oil and apply as instructed. The polish will provide further protection whilst giving a beautiful sheen to your items.
By taking the time to buff and polish regularly, you will enjoy beautifully restored furniture and countertops that will impress for many years to come.
Regular Maintenance
In order to keep your wooden pieces looking great, it's key to establish a regular maintenance routine, this will help to preserve their newly restored beauty and functionality.
For furniture, consider using furniture polish or wax to maintain the finish and protect against dust and scratches. Regular dusting with a soft cloth or microfibre duster will help keep surfaces clean and prevent buildup. Avoid placing hot or wet items directly on the surface to prevent damage to the finish.
Similarly, for kitchen worktops, wipe up spills promptly to prevent staining and use cutting boards and trivets to protect against scratches and heat damage. Regularly clean worktops with a mild detergent and water, avoiding harsh chemicals that can damage the finish.
Additionally, consider reapplying a protective finish every few years to maintain durability and water resistance. By incorporating these regular maintenance practices into your routine, you can ensure that your restored furniture and kitchen worktops continue to look their best for many years.
Bringing Life Back to Wooden Kitchen Worktops & Wood Furniture
The restoration process for wooden worktops and kitchen worktops and furniture is a rewarding task that allows us to breathe new life into cherished pieces and preserve their beauty for generations to come. By following the steps outlined in this guide, from assessing the condition of the wood to applying a protective finish and establishing regular maintenance practices, you can achieve stunning results that enhance both the aesthetic appeal and functionality of your furniture and worktops.
Whether you're restoring a family heirloom or rejuvenating a kitchen centerpiece, the satisfaction of seeing the transformation unfold is undeniable. With careful attention to detail and a commitment to proper care, your restored wooden pieces will continue to bring joy and beauty to your home for years to come.